
Want to install a solar system at home and wondering how to wire a solar panel battery? That’s a great idea to become more energy independent. It’s true, it may seem a bit complicated at first, but don’t panic! This guide is here to help you, step by step. We’ll look together at how to properly size your installation, choose the right elements and connect everything safely. Get ready to understand the basics and make your solar energy project a reality.
Key Points
- Properly assessing your energy needs is the first step for a successful and suitable solar panel battery connection.
- The choice of components (panels, battery, regulator, inverter) is important for the proper functioning and safety of your installation.
- Follow the steps for connecting the panels and the battery to the charge regulator to avoid errors.
- The correct configuration of the charge regulator is essential to protect your batteries and optimise their lifespan.
- Regular maintenance and performance monitoring are necessary to ensure the longevity of your solar system.
Understanding solar panel battery connection
Connecting a battery to a solar panel is a crucial step in harnessing solar energy autonomously. This allows you to store the energy produced during sunny periods and use it when the sun isn’t shining. This section aims to clarify the fundamental principles and components involved in this process.
Fundamental principles of solar energy
Solar energy relies on converting sunlight into electricity using photovoltaic panels. These panels are made up of solar cells that generate a direct current (DC) when exposed to light. This current can then be used directly, stored in batteries, or converted to alternating current (AC) to power household appliances. Understanding this conversion process is essential to optimise the efficiency of your installation.
Role of the battery in a solar system
The battery plays a central role in an autonomous solar system. It serves as an energy reservoir, allowing you to store the electricity produced by the solar panels for later use. Without a battery, solar energy would only be available when the sun is shining, which greatly limits its usefulness. The battery ensures a continuous power supply, even during the night or on cloudy days. It is important to note that the battery capacity must be adapted to your energy needs to ensure sufficient autonomy.
Types of batteries compatible with solar panels
There are several types of batteries compatible with solar panels, each with its advantages and disadvantages. The most common are:
- Lead-acid batteries: They are the most affordable, but have a shorter lifespan and require regular maintenance.
- AGM (Absorbent Glass Mat) batteries: They are maintenance-free, more resistant to vibration and can be discharged more deeply than conventional lead-acid batteries.
- Lithium-ion batteries: They offer a longer lifespan, higher energy density and require no maintenance. However, they are more expensive. Solencia can help you choose the compatible batteries with your installation.
The choice of battery will depend on your budget, your energy needs and your installation constraints. It is important to find out about the characteristics of each type of battery before making a decision.
Assessing the energy needs for your installation
Before connecting your battery to a solar panel, it is essential to accurately assess your energy needs. This step determines the proper sizing of your installation and ensures its long-term effectiveness. A correct assessment will allow you to avoid wasting energy and optimise your investment in a solar system. It is important to choose your solar kit carefully.
Calculating daily electricity consumption
The first step is to determine the amount of energy you consume daily. To do this, make a list of all the electrical appliances you use regularly, noting their power (in watts) and their daily usage time (in hours). Then multiply the power of each appliance by its usage time to obtain its daily energy consumption (in watthours). Then add up the consumption of all the appliances to get your total daily energy consumption.
For example, if you use a 60W bulb for 4 hours a day, its consumption is 240 Wh per day (60W x 4h = 240Wh). Do this for each appliance.
Determining the required battery capacity
Once you know your daily consumption, you need to determine the battery capacity needed to store the energy produced by your solar panels. This capacity must be sufficient to power your appliances during periods when sunshine is low or non-existent (e.g. at night or on cloudy days). Take into account the depth of discharge (DoD) recommended by the battery manufacturer. For example, a battery with a DoD of 50% means that you should not discharge more than half of its total capacity to preserve its lifespan.
It is advisable to allow a safety margin to take into account variations in consumption and energy losses related to the system. A margin of 20% is often recommended.
Here is an example calculation:
- Daily consumption: 1000 Wh
- Depth of discharge (DoD): 50%
- Battery voltage: 12V
Required battery capacity = (1000 Wh / 12V) / 0.5 = 166.67 Ah. So you would need a battery of about 170Ah.
Choosing the size of the solar panels
The sizing of the solar panels must be adapted to your energy consumption and the capacity of your battery. You must take into account the average sunshine in your region, the orientation and inclination of the panels, as well as the energy losses related to the system. The goal is to produce enough energy to fully charge your battery each day and power your appliances.
To properly size your panels, you can use the following formula:
Total panel power (W) = (Daily consumption (Wh) / Number of equivalent sunshine hours) / System efficiency
For example, if your consumption is 1000Wh, you have 5 hours of equivalent sunshine and an efficiency of 80%, then:
Total power = (1000 / 5) / 0.8 = 250W. So you will need about 250W of solar panels. For more information on the future of photovoltaics, you can consult specialised resources.
Selecting the essential components for the connection
Choosing the right components is essential to ensure the efficiency and durability of your solar installation. You can’t just take anything, you really have to think about each element. It’s a bit like choosing the ingredients for a recipe: if you put in anything, the result won’t be great.
Criteria for choosing solar panels
Several factors must be taken into account when selecting solar panels. You have to look at the power, the efficiency, the technology (monocrystalline, polycrystalline, etc.) and of course, the price.
- Power: Expressed in watts (W), it indicates the amount of electricity that the panel can produce under optimal conditions.
- Efficiency: Percentage of solar energy converted into electricity. Higher efficiency means more electricity for the same panel area.
- Technology: Monocrystalline panels are generally more efficient but more expensive than polycrystalline panels.
It is important to choose certified panels from recognised brands to ensure their quality and durability. Don’t hesitate to consult reviews and comparative tests before making your choice.
Importance of the charge regulator
The charge regulator is an indispensable element of the system. It protects the battery against overcharging and deep discharging, thus prolonging its lifespan. There are two main types of regulators: PWM (Pulse Width Modulation) and MPPT (Maximum Power Point Tracking). MPPT regulators are more efficient, especially in low sunlight conditions, but they are also more expensive. You have to assess your needs carefully to make the right choice. For a solar installation, it is important to choose quality starter cables.
Features of the inverter and converter
The inverter converts the direct current (DC) produced by the solar panels and stored in the battery into alternating current (AC), which can be used by most electrical appliances. The converter, on the other hand, allows you to change the voltage of the direct current (for example, from 12V to 24V). The choice of inverter depends on the total power of the appliances you want to power simultaneously. It is important to choose an inverter with sufficient power and good efficiency. If you encounter a database error, check the compatibility of the inverter with your system. For an autonomous installation, it is essential to understand the steps of connecting the regulator to the battery.
Site preparation and safety measures
Adequate site preparation and rigorous adherence to safety measures are essential steps before connecting your battery to a solar panel. Meticulous planning and careful execution minimise risks and ensure the longevity of your installation.
Choosing the optimal location for the panels
The choice of location for your solar panels is crucial for their performance. Several factors must be taken into account:
- Sun exposure: Choose a location that benefits from maximum sunshine throughout the day, without shading caused by trees, buildings or other obstacles. A south-facing orientation is generally ideal in the northern hemisphere.
- Inclination: The optimal angle of inclination depends on your latitude and the season. A higher angle is preferable in winter, while a lower angle is more suitable in summer. There are online calculators to determine the ideal inclination for your geographical location.
- Accessibility: Make sure that the chosen location is easily accessible for the installation, maintenance and cleaning of the panels. A clear space around the panels facilitates these operations.
It is important to note that the orientation and inclination of the solar panels have a direct impact on the amount of energy they can produce. A thorough study of the sunshine on your site is therefore strongly recommended.
Secure installation of supports and fixings
A solid and secure installation of the supports and fixings is essential to ensure the stability of the solar panels, even in extreme weather conditions. Here are some recommendations:
- Choice of materials: Use materials that are resistant to corrosion and weathering, such as aluminium or stainless steel. The supports must be sized to support the weight of the panels and withstand the forces of wind and snow.
- Appropriate fixings: Use fixings that are suitable for the type of roof or surface on which the panels are installed. For pitched roofs, specific fixing brackets are available. For flat roofs, ballast systems can be used.
- Compliance with standards: Comply with the building standards in force in your region. Call in a professional if you have any doubts about the solidity of your roof or the appropriate fixing method. Don’t forget to declare your installation to the town hall if its height exceeds 1.80m.
Electrical precautions and protective equipment
Connecting a battery to a solar panel involves electrical operations that can be dangerous if not performed correctly. It is imperative to take the necessary precautions and use appropriate protective equipment.
- Cut off the power supply: Before starting any electrical work, cut off the general power supply to the installation. Use a multimeter to check that there is no voltage.
- Wear protective equipment: Wear insulating gloves, safety glasses and appropriate work clothes. Avoid wearing jewellery or metal objects that could conduct electricity.
- Use insulated tools: Use tools specifically designed for electrical work, with insulated handles. Regularly check the condition of the tool insulation.
- Work in a dry environment: Avoid working in a damp or wet environment, as water is an excellent conductor of electricity.
- Know the polarities: Clearly identify the positive (+) and negative (-) polarities of the cables and terminals. A polarity reversal can damage the equipment.
- Call in a professional: If you are not sure of your electrical skills, call in a qualified professional. They will be able to carry out the connections safely and in accordance with the standards in force. Solaris-Store offers various solutions for producing your own electricity, including solar kits.
By following these recommendations, you will minimise the risks and ensure the safety of your solar installation.
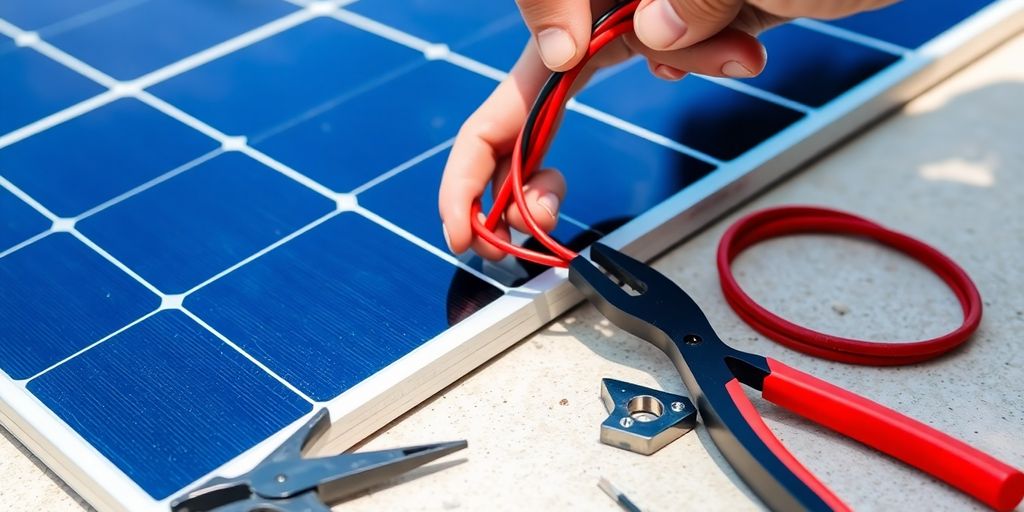
Solar panel connection procedure
Connecting panels in series or parallel
The choice between a series or parallel connection depends on the voltage and current required by your system. A series connection increases the voltage, while a parallel connection increases the current. It is crucial to understand the specifications of your charge regulator and battery to determine the most appropriate configuration.
- Series: The panels are connected in a chain, the positive of one panel to the negative of the next. The voltage adds up, the current remains the same.
- Parallel: The panels are connected side by side, positive with positive and negative with negative. The current adds up, the voltage remains the same.
- Hybrid: Combination of the two methods to achieve the desired voltage and current.
It is imperative to consult the solar panel data sheets to know their electrical characteristics (open circuit voltage Voc, short circuit current Isc, voltage at maximum power Vmp, current at maximum power Imp). This information is essential for configuring the connection correctly.
Connection to the charge regulator
The charge regulator is an essential component that protects your battery against overcharging and excessive discharging. It must be connected between the solar panels and the battery. Make sure to respect the polarity when connecting: the positive (+) of the panels to the positive (+) of the regulator, and the negative (-) of the panels to the negative (-) of the regulator. Incorrect connection can damage the regulator and the panels. It is important to understand the connection of solar panels to avoid costly errors.
- Check the compatibility of the regulator with the voltage of the panels.
- Connect the cables from the panels to the input terminals of the regulator.
- Tighten the terminals properly to avoid false contacts.
Checking polarities and voltages
Before connecting the battery, it is imperative to check the polarities and voltages using a multimeter. A polarity reversal can cause irreversible damage to the battery and other system components. Make sure that the voltage delivered by the solar panels is compatible with the input voltage of the charge regulator. Too high a voltage can damage the regulator. It is also important to check the electrical safety standards in force to avoid any accidents.
- Use a multimeter to measure the open circuit voltage (Voc) of the panels.
- Check the polarity of the cables before connecting them.
- Make sure that the voltage is within the operating range of the regulator.
Connecting the battery to the solar system
Setting up the batteries and wiring
Setting up the batteries is a crucial step in ensuring the performance and longevity of your solar system. It is imperative to choose an appropriate location that is dry, ventilated and protected from extreme temperatures. The space must also be easily accessible for maintenance.
The wiring is just as important. Use cables of a section adapted to the intensity of the current that will circulate. Undersized cables can lead to overheating and significant energy loss. Make sure that all cables are properly insulated and protected against mechanical damage.
- Check the compatibility of the batteries with each other (same brand, same model, same age).
- Use cables of appropriate section.
- Protect the cables against damage.
Connection to the charge regulator and inverter
The connection of the battery to the charge regulator and the inverter must be carried out with great care. The charge regulator protects the battery against overcharging and deep discharging, thus prolonging its lifespan. The inverter, on the other hand, converts the direct current (DC) from the battery into alternating current (AC) that can be used by your electrical appliances.
It is imperative to respect the polarities when making connections. A polarity reversal can irreparably damage the equipment. Carefully consult the wiring diagrams provided by the manufacturers and use a multimeter to check the voltages and polarities before putting the system into service. For a successful installation, it is important to understand the solar wiring diagram.
A good practice is to install protective fuses on the cables connecting the battery to the charge regulator and the inverter. These fuses protect the equipment against short circuits and overcurrents.
Importance of battery balancing
Battery balancing is essential in systems using multiple batteries in series or parallel. Indeed, even identical batteries may have slight differences in capacity or internal resistance. These differences can lead to a charge imbalance, where some batteries charge or discharge faster than others.
This imbalance can reduce the overall lifespan of the battery bank and lead to premature failures. To avoid this, it is recommended to use a battery balancer, which redistributes the current between the batteries to maintain a uniform charge level. It is important to note that two identical installations will not cause the same ageing of the battery bank depending on their different uses.
- Use a battery balancer.
- Regularly check the voltage of each battery.
- Replace defective batteries.
Installation and configuration of the charge regulator
The charge regulator is an essential component of your solar system. It protects your batteries against overcharging and deep discharging, thus prolonging their lifespan. Proper installation and configuration are therefore essential to ensure the proper functioning and longevity of your solar installation.
Types of regulators: PWM and MPPT
There are mainly two types of charge regulators: PWM (Pulse Width Modulation) and MPPT (Maximum Power Point Tracking). The choice between these two technologies will depend on your budget and the characteristics of your installation.
- PWM: These regulators are more economical and suitable for small installations where the voltage of the solar panels is close to that of the battery. They work by chopping the current to maintain the appropriate charging voltage.
- MPPT: These regulators are more sophisticated and more efficient, particularly when the voltage of the solar panels is significantly higher than that of the battery. They continuously search for the maximum power point of the panels to optimise energy production. The MPPT regulator automatically calibrates to the voltage of the battery bank during initial connection.
Setting charge and discharge thresholds
Correctly setting the charge and discharge thresholds is crucial for the health of your batteries. These thresholds vary depending on the type of battery (AGM, GEL, Lithium, etc.) and must be configured in accordance with the manufacturer’s recommendations. Incorrect settings can lead to premature degradation of your batteries.
Here are some important parameters to configure:
- Maximum charging voltage: The voltage at which the regulator stops charging the battery to prevent overcharging.
- Float voltage: The voltage at which the regulator maintains the battery once it is fully charged.
- Disconnection voltage in case of discharge: The voltage at which the regulator cuts off the power supply to prevent deep discharge.
It is strongly recommended to consult the user manual of your charge regulator and batteries to find out the recommended voltage values. Particular attention should be paid to the compatibility between the regulator and the type of battery used.
Monitoring and optimising the charge
Once your system is installed and configured, it is important to regularly monitor the charging performance. Most modern charge regulators are equipped with LCD screens or Bluetooth connectivity to facilitate monitoring. This monitoring allows you to quickly identify any problems and optimise the charging parameters to maximise the lifespan of your batteries.
Here are some points to monitor:
- Battery voltage
- Charging current
- State of charge (SOC)
- Battery temperature
Commissioning and functional testing
Once all the connections have been made, it is imperative to proceed with the commissioning and functional testing of your solar system. This step ensures that the installation is working correctly and safely. Do not neglect this step, as it is crucial for the sustainability of your installation.
Checking connections and indicators
Before switching on the system, carefully check all connections. Make sure that the cables are properly tightened and that the polarities are respected. Poor contact or a polarity reversal can damage the components of your installation. Also examine the indicator lights on the charge regulator and the inverter. These indicators provide valuable information on the operating status of the system. For example, an overload indicator may indicate a problem with the sizing of the solar panels or the battery. Do not hesitate to consult the user manual of each device to understand the meaning of the different indicators.
Energy production and charging tests
Once the checks have been carried out, switch on the system. Use a multimeter to measure the voltage and current produced by the solar panels. Compare these values with the technical specifications of the panels to check that they are working correctly. Also monitor the battery charging process. The charge regulator must adjust the charging voltage and current according to the state of the battery. You can also check the battery voltage using the multimeter to make sure it is charging correctly. If you notice any anomalies, stop the system immediately and look for the cause of the problem.
Troubleshooting common problems
Even with a careful installation, problems can occur during commissioning. Here are some common problems and their solutions:
- No energy production: Check the connections of the solar panels, the sunshine and the condition of the charge regulator.
- Battery not charging: Check the charge regulator settings, the condition of the battery and the connections.
- Inverter not working: Check the battery voltage, the connections and the inverter settings.
It is important to note that troubleshooting some problems may require specific technical skills. If you are not sure of yourself, call in a qualified professional. It is better to prevent the risk of electric shock or damage to the equipment.
By following these steps, you will be able to commission and test your solar system safely. Remember that regular monitoring of the performance of your installation is essential to ensure its proper functioning and longevity. Remember to check the database regularly to make sure there are no errors.
Here is a summary table of typical voltages to monitor:
| Component | Typical voltage (12V) | Typical voltage (24V) | Typical voltage (48V) |
|---|---|---|---|
| Solar panels | 17-22V | 34-44V | 68-88V |
| Battery | 12-14V | 24-28V | 48-56V |
| Inverter | 12V/24V/48V | 24V/48V | 48V |
Remember to consult the user manuals of your equipment to find out the specific voltages for your installation. For more information on installation, you can consult an online solar installation guide.
Maintenance and optimisation of your solar system
It is imperative not to neglect the maintenance of your solar installation to guarantee its durability and optimal performance. Regular maintenance allows you to detect and correct potential problems before they cause significant damage or loss of energy production. In addition, continuous optimisation of your system can improve its efficiency and maximise your return on investment. It is important to check the electrical safety standards in force to avoid any problems.
Regular cleaning of solar panels
Dust, leaves, bird droppings and other dirt can accumulate on the surface of solar panels, reducing their ability to capture sunlight. Regular cleaning is therefore essential. The frequency of cleaning depends on the environment in which your panels are located. In urban or agricultural areas, cleaning every six months may be necessary, while in cleaner areas, annual cleaning may be sufficient. Use fresh water and a soft brush to clean the panels, avoiding abrasive products that could damage them. It is important to monitor the system performance after cleaning.
Battery maintenance and connection checks
Batteries are an essential element of your solar system, and their maintenance is crucial to prolong their lifespan. Regularly check the battery terminals to make sure they are clean and free of corrosion. Clean them if necessary with a wire brush and a mixture of water and baking soda. Also make sure that the connections are tight. A poor connection can lead to power loss and overheating. It is also important to check the electrolyte level of lead-acid batteries and top it up with distilled water if necessary. Balancing the batteries is also a recommended practice to ensure a uniform lifespan.
Performance monitoring and adjustments
Regular monitoring of the performance of your solar system allows you to quickly detect any potential problems. Monitor the energy production of your solar panels, the voltage and current of the batteries, and the energy consumption of your appliances. If you notice a drop in performance, check the connections, cables and components to identify the cause of the problem. Do not hesitate to call in a professional to carry out a more in-depth diagnosis. Optimising the charge is an important element for system maintenance.
It is recommended to keep a record of all maintenance operations carried out on your solar system, including cleaning dates, battery checks and repairs. This record will help you to track the condition of your system and plan future interventions.
Here are some points to monitor:
- Daily and monthly energy production
- Voltage and current of the batteries
- State of charge of the batteries
- Energy consumption of appliances
| Component | Frequency | Action